Browsing Posts published by james

If you’ve developed on a web application of any degree of complexity, you’ve encountered times when you would like to politely take the site offline or make it unavailable to some users. ASP.NET 2.0 introduced a nifty new feature the App_Offline.htm file. If ASP.NET detects this file in your vroot, it drains the request queue, displays the contents of App_Offline.htm for any new request, and politely shuts down the app domain. You can then update the application, remove (or rename) the App_Offline.htm file and a new app domain will be spun up to start servicing requests again. Wonderful stuff, but what happens when your requirements are more complex? For instance, what if you need to take the application offline for a nightly database
backup? What if certain users can only access a data entry application
during certain hours of the day? What if you want to deploy updates to
an application and only allow a group of testers and/or admins in to
verify the updates? Enter the SiteAvailabilityModule. The SiteAvailabilityModule allows you to control whether or not your site is available to users based on group membership and time of day. For instance, normal users are only allowed access during normal business hours, but administrators can access the site at any time for maintenance and troubleshooting.

Now before we get too deeply engrossed in the code, let’s take a step back and think about how one might naively implement this feature. If you don’t know your ASP.NET pipeline, Grasshopper, you would likely code this logic into every Page_Load method on every ASPX page. If you were smart (but still didn’t know your ASP.NET pipeline), you would write a helper class so that the logic isn’t repeated in every Page_Load. (Neither solution is ideal because it’s too easy to forget to add the logic when implementing a new page.) If you were really smart, you would know a thing or two about the ASP.NET pipeline and realize that you could implement a HttpModule to accomplish this in one place.

Let’s start by taking a look at the ASP.NET pipeline:

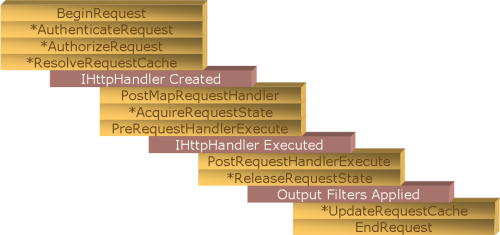
The stages in the above diagram marked with an asterisk (*) have a corresponding “Post” event. For example, AuthenticateRequest and PostAuthenticateRequest. (This is a prettier version than the one I included in the third ImpostorHttpModule post.)

Now at which stage do we want to patch into the ASP.NET pipeline? As a general rule, you want to patch in as early as possible. For instance, if we were only concerned with the time of day, we would patch into the BeginRequest. The reason for patching in as early as possible is that the later you patch in, the more work ASP.NET has done. If you’re going to display a static page (or at least one with low processing overhead), try to do as little work as possible in making that determination.

Now let’s see why you might want to patch in at other places…

If you need to know who is accessing the site… PostAuthenticateRequest.

If you need to know whether that user is authorized to access a particular resource… PostAuthorizeRequest.

If you only want to execute if there is no cached content for that resource… PostResolveRequestCache.

If you need to know which handler will be executed… PostMapRequestHandler.

If you need something that you squirreled away in session state… PostAcquireRequestState.

You get the idea. Depending on what information you require, you will want to patch in at a particular stage. For our purposes, we need to know if the user is in the Administrators group. The user’s group memberships are determined in AuthorizeRequest. So we need to hook into PostAuthorizeRequest.

public void Init(HttpApplication context) {
    context.PostAuthorizeRequest += new EventHandler(context_PostAuthorizeRequest);
}

Easy enough, but let’s look at the event handler as that is where the real action is happening…

void context_PostAuthorizeRequest(object sender, EventArgs e) {
    string ext = Path.GetExtension(HttpContext.Current.Request.Path).ToLowerInvariant();
    if(ext == “.aspx”) {
        TimeSpan now = DateTime.Now.TimeOfDay;
        if(now < Availability.Instance.StartTime.TimeOfDay
                || now > Availability.Instance.EndTime.TimeOfDay) {
            // If we’re outside normal hours, check to see if the user is in any
            // of the exempt roles. By default, only members of the SiteAvailabilityExempt
            // role are exempt from site availability constraints.
            if(!HttpContext.Current.User.IsInRole(Availability.Instance.ExemptRole)) {
                HttpContext.Current.RewritePath(Availability.Instance.SiteUnavailablePage);
            }                   
        }
    }
}

We first check to see if we’re dealing with a request for an ASPX page. Remember, we’re patched into the ASP.NET pipeline, which in ASP.NET 2.0 means that we’re being called when serving up both dynamic and static content. So if we’re dealing with a request for an image, cascading stylesheet (CSS), JavaScript file, or other non-ASPX content, we better not serve up the site unavailable page! We need to allow requests for resources to pass through unaltered. Hence the check for whether we’re dealing with an ASPX page or not.

Next part is simple. Are we outside of the normal hours of operation? The Availability class is derived from System.Configuration.ApplicationSettingsBase and leverages off the new System.Configuration features. We set our configuration properties in Web.config beneath the <configuration/> root element:

<configSections>
    <sectionGroup name=”applicationSettings” type=”System.Configuration.ApplicationSettingsGroup, System, Version=2.0.0.0, Culture=neutral, PublicKeyToken=b77a5c561934e089″>
        <section name=”JamesKovacs.Web.HttpModules.Availability” type=”System.Configuration.ClientSettingsSection, System, Version=2.0.0.0, Culture=neutral, PublicKeyToken=b77a5c561934e089″/>
    </sectionGroup>
</configSections>

<applicationSettings>
    <JamesKovacs.Web.HttpModules.Availability>
        <setting name=”StartTime” serializeAs=”String”>
            <value>8:00 AM</value>
        </setting>
        <setting name=”EndTime” serializeAs=”String”>
            <value>4:00 PM</value>
        </setting>
    </JamesKovacs.Web.HttpModules.Availability>
</applicationSettings>

The class defines some sensible default values so that we can run without any configuration in Web.config.

If we’re outside of regular hours, we need to find out if the user is in the exempt role, which by default is a local group called SiteAvailabilityExempt. If we’re not a member of the exempt role, we re-write the URL to point to SiteUnavailablePage, which by default is ~/SiteUnavailable.aspx.

Let’s look at what is actually happening because it’s not a redirect or transfer. We are in PostAuthorizeRequest. We don’t decide which ASPX page we will be executing until the step marked “IHttpHandler Created”. So we haven’t created the HttpHandler, or System.Web.UI.Page-derived class, in this case. HttpContext.Current.RewritePath() actually changes the URL of the request while the request is “in-flight”. So no matter which page the user browses to, she will see the contents of SiteUnavailable.aspx. She won’t know it’s SiteUnavailable.aspx, but it is. The URL will show http://www.example.com/Default.aspx or whatever page was originally requested. Think about how powerful this technique is. If we redirected to SiteUnavailable.aspx, the user could refresh her browser all day and she would always see SiteUnavailable.aspx even if the clock rolled over into business hours. To the server, you’re requesting SiteUnavailable.aspx and that’s what I’m going to serve up. With URL rewriting, we keep the original URL, but serve up alternate content. If the user refreshes and we’ve rolled into business hours, the SiteAvailabilityModule lets the request through unaltered and the user sees the correct page. Cool or what?

You can download the code here. I’ve included all the HttpModules from the Calgary Code Camp in addition to an updated version of the SiteAvailabilityModule. As always, feedback is appreciated. Enjoy!

[EDIT — Corrected text to match the code. Thanks, Lance, for catching the error.]

A few days ago, I blogged about the Calgary Code Camp being a huge success based on verbal testimony from quite a number of people, as well as the evals from the event. Unsolicited, written testimony is always better than just taking my word for it, especially given that I was one of the organizers. Justice Gray documents his roadtrip to the Calgary Code Camp along with poetic summaries of the talks he attended. Glad you enjoyed my talk, Justice. I would agree that “ASP.NET Kung-Fu: Intermediate Techniques and Idioms” just doesn’t sound as sexy. So I think I’ll stick to my title. Besides intermediate for you is advanced to most. :^) I’m flattered to hear that I’m your favourite presenter ever. Gave me a warm fuzzy feeling all weekend. Now I just have to organize a bunch of Calgarians to come up to your Code Camp in September and win all of your door prizes. :^P (The folks from Edmonton will know what I’m talking about.)

For our first event, the Calgary Code Camp was a huge success, if I do say so myself. We had over 80 developers attend and both tracks were constantly buzzing with great discussions. Thanks to everyone who presented for generously sharing their time and knowledge! Thanks also to everyone who attended and made the day a success. We’ll be posting slidedecks and demos to the Calgary Code Camp website in the coming week. In the meantime you can find mine here. You can find some extra goodies in the zip file that I didn’t have time to demo, such as the DatabaseImageHandler and the SiteAvailabilityModule, which I’ll be blogging about in the next while.

If you’re headed to TechEd 2006 in Boston in a few weeks and are interested in discussing what’s new and happening in data access, drop Jonathan Bruce an email. He’s organizing an informal get together of folks interested in ADO.NET. Sounds like it should be a fun time. Hope to see you there.

In the previous two parts (Part 1 and Part 2), I introduced the ImpostorHttpModule as a way to test intranet applications that use role-based security without having to modify your group memberships. (I’ll assume that you know what I’m talking about. If not, go back and re-read the first two parts.) In the final part, let’s look at what exactly is going on behind the scenes with ImpostorHttpModule…

The ImpostorHttpModule requires surprisingly little code to work its magic. Let’s think about exactly what we want to do. We want to intercept every HTTP request and substitute the list of roles defined for the incoming user in the ~/App_Data/Impostors.xml file instead of the user’s actual roles. (In an intranet scenario, a user’s roles are often just the local and domain groups to which the user belongs.) To do this, we need to implement a HttpModule. We’ll start with the simplest HttpModule, which we’ll call NopHttpModule for “No operation”.

using System.Web;

namespace JamesKovacs.Web.HttpModules {
    public class NopHttpModule : IHttpModule {
        public void Init(HttpApplication context) {
        }

        public void Dispose() {
        }
    }
}

To be a HttpModule, we simply need to implement IHttpModule and provide implementations for the two methods, Init() and Dispose(). We now have to register ourselves with the ASP.NET pipeline. We do this using the <httpModules> section of Web.config.

<?xml version=”1.0″?>
<configuration>
    <system.web>
        <httpModules>
            <add name=”NopHttpModule” type=”JamesKovacs.Web.HttpModules.NopHttpModule, JamesKovacs.Web.HttpModules”/>
        </httpModules>
    </system.web>
</configuration>

That’s it. Not terribly interesting because it does absolutely nothing. So let’s move on and implement the HelloWorldHttpModule, which simply returns “Hello, world!” no matter what you browse to, whether it exists or not!

using System;
using System.Web;

namespace JamesKovacs.Web.HttpModules {
    public class HelloWorldHttpModule : IHttpModule {
        public void Init(HttpApplication context) {
            context.BeginRequest += new EventHandler(context_BeginRequest);
        }

        void context_BeginRequest(object sender, EventArgs e) {
            HttpContext.Current.Response.Write(“<html><body><h1>Hello, World!</h1></body></html>”);
            HttpContext.Current.Response.End();
        }

        public void Dispose() {
        }
    }
}

Try browsing to /Default.aspx, /Reports/Default.aspx, /ThisDoesNotExist.aspx, or even /ThisDoesNotExistEither.jpg. They all return “Hello, World!” (N.B. ASP.NET 1.X will return a 404 for the JPEG. ASP.NET 2.0 will return “Hello, World!” In 1.X, static
files were served up directly by IIS without ASP.NET getting involved. Although this gives excellent
performance for images, CSS, JavaScript files, etc., it also meant that
those files were not protected by ASP.NET security. With ASP.NET 2.0, all unknown files types are handled by
the System.Web.DefaultHttpHandler, which allows non-ASP.NET resources to be protected by ASP.NET security as well. See here for more information.)

Now back to our regularly scheduled explanation… In our Init() method, we tell the HttpApplication which events we would like to be informed of. In this case, we grab the BeginRequest event, which is the first event of the ASP.NET pipeline. It occurs even before we determine if the URL is valid, hence our ability to serve up “missing content”.

ASP.NET provides many hooks into its processing pipeline. Here is an excerpt from MSDN2 on the sequence of events that HttpApplication fires during processing:

  1. BeginRequest
  2. AuthenticateRequest
  3. PostAuthenticateRequest
  4. AuthorizeRequest
  5. PostAuthorizeRequest
  6. ResolveRequestCache
  7. PostResolveRequestCache

    After the PostResolveRequestCache event and before the PostMapRequestHandler event, an IHttpHandler (a page or other handler corresponding to the request URL) is created.

  8. PostMapRequestHandler
  9. AcquireRequestState
  10. PostAcquireRequestState
  11. PreRequestHandlerExecute

    The IHttpHandler is executed.

  12. PostRequestHandlerExecute
  13. ReleaseRequestState
  14. PostReleaseRequestState

    After the PostReleaseRequestState event, response filters, if any, filter the output.

  15. UpdateRequestCache
  16. PostUpdateRequestCache
  17. EndRequest

The pipeline in ASP.NET 1.X had many, but not all, of these events. ASP.NET 2.0 definitely gives you much more flexibility in plugging into the execution pipeline. I’ll leave it as an exercise to the reader to investigate why you might want to capture each of the events.

Armed with this information, you can probably figure out which event we want to hook in the ImpostorHttpModule. Let’s walk through the thought process anyway… We are trying to substitute the actual user’s roles/groups for one that we’ve defined in the ~/App_Data/Impostors.xml file. To do this we need to know the user. So we need to execute after the user has been authenticated. We need to execute (and substitute the groups/roles) before any authorization decisions are made otherwise you might get inconsistent behaviour. For instance, authorization may take place against your real groups/roles and succeed, but then a PrincipalPermission demand for the same group/roles might fail because the new groups/roles have been substituted. So which event fits the bill? PostAuthenticateRequest is the one we’re after. In this event, we know the user, which was determined in AuthenticateRequest, but authorization has not been performed yet as it occurs in AuthorizeRequest.

public void Init(HttpApplication context) {
    context.PostAuthenticateRequest += new EventHandler(context_PostAuthenticateRequest);
}

We know which event we want to hook. Now what to do once we hook it. In .NET, we have Identities and Principals. An Identity object specifies who has been authenticated, but does not indicate membership in groups/roles. A Principal object encapsulates the groups/roles and the identity. So what we want to do is construct a new Principal based on the authenticated Identity and populate with the groups/roles that we read in from ~/App_Data/Impostors.xml. As it so happens, the built-in GenericPrinicpal fits the bill quite nicely. It takes a IIdentity object and a list of roles (in the form of an array of strings). N.B. It doesn’t matter if the Identity is a WindowsIdentity, a FormsIdentity, a GenericIdentity, or any other. All that matters is that the Identity implements the IIdentity interface. This makes the group/role substitution code work equally well regardless of authentication technology.

IIdentity identity = HttpContext.Current.User.Identity;
string[] roles = lookUpRoleListFromXmlFile(identity);    // pseudo-code
IPrincipal userWithRoles = new GenericPrincipal(identity, roles);

Armed with userWithRoles, we just need to patch it into the appropriate places:

HttpContext.Current.User = userWithRoles;
Thread.CurrentPrincipal = userWithRoles;

We have discarded the original principal (but kept the original identity) and patched in our custom one. That’s about it. Any authorization requests are evaluated against the new GenericPrincipal and hence the group/role list that we substituted.

An additional feature I would like to point out is caching of the users/roles as you probably don’t want to parse a XML file on every request. The users/roles list will auto-refresh if the underlying ~/App_Data/Impostors.xml file changes. Let’s see how this works. We store a Dictionary<string, string[]> in the ASP.NET Cache, which contains users versus roles as parsed from the ~/App_Data/Impostors.xml file. If it doesn’t exist in the Cache, we parse the XML file and insert it into the Cache along with a CacheDependency like this:

HttpContext.Current.Cache.Insert(“ImpostorCache”, impostors, new CacheDependency(pathToImpostorsFile));

When the underlying file changes, the entry is flushed from the cache. The next time the code runs, the cache is re-populated with the contents of the updated ~/App_Data/Impostors.xml.

One last point… The ImpostorHttpModule is meant for development/testing purposes, which means that I haven’t optimized it for performance, but for ease of implementation and comprehension.

So there you have it – the ImpostorHttpModule. Hopefully you have a better appreciation for the power and extensibility built into ASP.NET as well as some cool ideas of what else you can implement using HttpModules. Full source code can be found here.

A light news show… hopefully. You can grab it here. The episode will hit MSDN Canada Community Radio in the near future.

Show Notes

Resources

In our last cliff-hanger episode, I introduced the ImpostorHttpModule. I’m going to show how you can use it to implement and test a sitemap and navigation menu in ASP.NET. We’ll use the new ASP.NET 2.0 Master Pages feature because it’s the easiest way to ensure that the same menu ends up on every page. We’ll start from the previous solution with the ImpostorHttpModule registered in the Web.config. I’ve created three pages, ~/Default.aspx, ~/Reports/Default.aspx, and ~/Admin/Default.aspx. The Web.config files are set up as follows:

Path Allowed Roles
~/Default.aspx User, Manager, Administrator
~/Reports/Defaults.aspx Manager, Administrator
~/Admin/Default.aspx Administrator

We’ll be using the security trimming feature of sitemaps, which removes nodes from the sitemap that are not accessible by the current user. Note that this is simply a UI nicety and not actual security – without the appropriate Web.config files and <authorization> sections, users could still access those areas by navigating directly to them. So let’s start by implementing the menu and then we’ll enable security trimming. We’ll see how ImpostorHttpModule can help us in testing these features.

Our first step is to add a sitemap, which we’ll leave with the default name of Web.sitemap. We’ll add three nodes – Home, Reports and Administration. One of the odd things about the sitemap XML schema is that the child of <siteMap> must be a single <siteMapNode>. So if you want to have multiple nodes, you need to create an empty <siteMapNode> with further child nodes like this:

<?xml version=”1.0″ encoding=”utf-8″ ?>
<siteMap xmlns=”http://schemas.microsoft.com/AspNet/SiteMap-File-1.0” >
    <siteMapNode>
        <siteMapNode url=”~/Default.aspx” title=”Home”  description=”Return to the Home page” />
        <siteMapNode url=”~/Reports/Default.aspx” title=”Reports” description=”Go to reports” />
        <siteMapNode url=”~/Admin/Default.aspx” title=”Administration”  description=”Go to site administration” />
    </siteMapNode>
</siteMap>

One quick note is the use of ~/ which allows us to create links that are relative to the application’s virtual directory. This is a great ASP.NET feature, which works in most places links are found in server-side controls, as it allows you to deploy the site at http://servername/ or http://servername/someVdir/ or anywhere else.

Now that we have our sitemap set up, we can create a Menu that is driven by the sitemap. We’ll create a master page called Main.master and add the Menu to it in design mode. We’ll create a new SiteMapDataSource and point the Menu control at it. Since we have an empty starting node, we’ll set SiteMapDataSource.ShowStartingNode = false. (I also changed the menu to use the Classic style and horizontal orientation.) We should now see three nodes: Home, Reports, and Administration in the Menu. If we try to browse the site, we’ll get a 401 – Access Denied because our user account is not in any of the appropriate roles. At least the Web.config files are doing their jobs. Let’s see how to use the ImpostorHttpModule to give ourselves access to these directories without having to create a local or domain group or add our user account to it. (In a deployment situation, you would likely have a domain group that a domain admin would add users to. We’re trying to avoid all the overhead of calling up your friendly neighbourhood domain admin every time you want to test a different security context when accessing your app. Believe me – your domain admin will thank you.)

So let’s add our user, DOMAIN\Foo, to the User, Manager, and Administrator role in the ~/App_Data/Impostors.xml file. (N.B. If you’re logged on using a local account, you’ll need to specify MACHINE\Bar. If you logged in using the alternate user name syntax, foo@example.com, you’ll need to use this in the name.)

<?xml version=”1.0″ encoding=”utf-8″ ?>
<impostors>
    <impostor name=”DOMAIN\Foo” roles=”User, Manager, Administrator”/>
</impostors>

Clicking on the Menu links should allow you to see the Reports and Administration sections. All is good in the world. Now let’s implement security trimming! Our next stop is Web.config where we’ll have to add a new sitemap provider as the default one declared in Machine.config does not have security trimming enabled. The key attribute here is securityTrimmingEnabled=”true”.

<siteMap defaultProvider=”XmlSiteMapProvider” enabled=”true”>
   <providers>
      <add name=”XmlSiteMapProvider” description=”Default SiteMap provider.” type=”System.Web.XmlSiteMapProvider” siteMapFile=”Web.sitemap” securityTrimmingEnabled=”true”/>
   </providers>
</siteMap>

With this change, the menu disappears entirely! We haven’t defined any roles that can see the nodes. So they are all trimmed off. Let’s update the Web.sitemap to add the roles:

<?xml version=”1.0″ encoding=”utf-8″ ?>
<siteMap xmlns=”http://schemas.microsoft.com/AspNet/SiteMap-File-1.0” >
    <siteMapNode roles=”User, Manager, Administrator”>
        <siteMapNode url=”~/Default.aspx” title=”Home”  description=”Return to the Home page” roles=”User, Manager, Administrator” />
        <siteMapNode url=”~/Reports/Default.aspx” title=”Reports” description=”Go to reports” roles=”Manager, Administrator” />
        <siteMapNode url=”~/Admin/Default.aspx” title=”Administration”  description=”Go to site administration” roles=”Administrator” />
    </siteMapNode>
</siteMap>

A quick note is that you must specify all the roles on the empty <siteMapNode>. If you do not, it gets trimmed and none of the child nodes get displayed either. (Took me awhile to realize this the first time I used sitemaps and security trimming.)

Now that we have everything in order, try removing your user account from the Administrator role in ~/App_Data/Impostors.xml and browse to ~/Default.aspx. The Administration link disappears. You can now happily add and remove roles from your user account to test what different kinds of users would see when they browse the site.

In summary, the ImpostorHttpModule allows us to easily test different security configurations for our site without having to change your local or domain group memberships. Since we’re replacing the list of roles that the incoming user is a member of, this technique not only works for testing sitemaps and website security using <authorization>, but it also works for declarative and imperative security demands in code. Full source code is available here. In our next episode, we’ll look at how the ImpostorHttpModule works under the covers.

If you’ve developed any moderately complex web application, you’ve probably implemented some form of role-based security. For instance, only administrators can access the /Admin directory. Only ContentCreators can update web page content. Only RegisteredUsers can access the site. ASP.NET makes all of this relatively easy through the <authorization> section of the web.config file(s), programmatic security, and security trimming of site maps. Managing roles is even easier with ASP.NET 2.0 as we now have the role manager (represented by System.Web.Security.Roles) and various RoleProviders. If you’re using the SqlRoleProvider, you can test different configurations of your website by adding and removing your user from various roles and not caching role memberships in cookies. (If you cache your role memberships in cookies, you either have to wait for the cookie to expire or clear your browser cookies every time you change your role membership to ensure that you have the correct memberships.) It’s tedious, but it can be done. Even more tedious is testing role-based security for an intranet application if you’re using Windows groups via the WindowsTokenRoleProvider. Basically your Windows group memberships become your roles. Simple enough – add your user to the appropriate local or domain groups using the Local Users and Groups or Active Directory MMC snap-in and you’re good to go. Right? Not quite. Your group memberships in your user token don’t get updated until you log out and back in again. (I’m ignoring some advanced security APIs that allow you to invalidate your user token and re-acquire it.) Now this is really tedious and is likely going to result in you doing less testing under different role memberships than you really should. Is there a way that we can improve this? I’m glad you asked. Enter the ImpostorHttpModule.

The ImpostorHttpModule is an ASP.NET HttpModule that re-writes an authenticated user’s roles based on a XML file, ~/App_Data/Impostors.xml. To use the module, simply drop the assembly into ~/Bin/ and add the following section to your web.config file:

<httpModules>
  <add name=”ImpostorHttpModule” type=”JamesKovacs.Web.HttpModules.ImpostorHttpModule, JamesKovacs.Web.HttpModules”/>
</httpModules>

Then create a XML file called ~/App_Data/Impostors.xml, which looks like this:

<?xml version=”1.0″ encoding=”utf-8″ ?>
<impostors>
  <impostor name=”DOMAIN\Jane” roles=”User, Manager, Administrator”/>
  <impostor name=”MACHINE\Bob” roles=”User”/>
</impostors>

The file format should be fairly self-explanatory. The name attribute is the log-in name of the user. It can be a local, domain, forms auth, or other user and is not case sensitive. The roles attribute is a comma-separated list of groups or roles to place the user in. The users can be authenticated by Windows, Forms, Passport, or any other authorization mechanism. The ImpostorHttpModule inserts itself after the authentication event and replaces the role membership of the incoming user with a GenericPrincipal if, and only if, the user is found in Impostors.xml. If the user is not found, their existing role memberships remain untouched. Impostors.xml file is located in ~/App_Data because by default, ASP.NET 2.0 doesn’t allow browser access to any files in this directory. It saves you from having to filter out and deny requests for this file yourself. ImpostorHttpModule monitors the Impostors.xml file for changes. So as soon as you update it with new user or role information, subsequent requests will acquire the new roles. You can see the new roles by browsing to ShowContexts.aspx, which was created by Dominick Baier. (You can download full source from his site here.) At the bottom, you’ll see your role memberships listed. Play around with Impostor.xml and see how your memberships change.

I should note that ImpostorHttpModule is only meant for development purposes. It will get very upset (e.g. blow chunks) with a bad Impostors.xml file. If you need a robust role management system, consider using Windows groups or the SqlRoleProvider. ImpostorHttpModule is meant as a quick-n-dirty testing tool. That said, you can download the ImpostorHttpModule with source code from here. In my next installment, I’ll show how to create a security-trimmed sitemap and test it with the ImpostorHttpModule. Also stay tuned for a detailed walkthrough of the source code where I’ll explain in painstaking detail how ImpostorHttpModule actually works.

EDIT: Updated ImpostorHttpModule to use a comma-separated list of roles to match <authorization> in Web.config and sitemaps.

Kenny Kerr has updated Window Clippings, which I mentioned here, with some cool new features including:

  • Capturing the PrtScn key to initiate clippings
  • Saving images in the TIFF format
  • Prompt for storage location (rather than always dropping it in the same location)
  • Windows Vista support

You can download x86 or x64 versions, as appropriate, from here. Awesome tool! Thanks, Kenny!!! The x64 build is a great touch.

Jean-Paul reappears on dnrTV to talk about Model-View-Presenter, which is a cool pattern for abstracting away your UI implementation technology. For example you can re-use the same Model and Presenter code with ASP.NET and WinForms. Additionally the view ends up being really dumb, which means that parsing, validation, and other logic traditionally in your ASPX code-behind or WinFom is now encapsulated in the presenter and can be identical between the two. This episode is well worth the watch.

Jean-Paul Boodhoo on Model-View-Presenter

Also worth watching is Jean-Paul’s earlier double-header on Test-Driven Development (TDD). You want to see how TDD is meant to be done, watch and learn!

Jean-Paul Boodhoo on Test-Driven Development Part 1 of 2

Jean-Paul Boodhoo on Test-Driven Development Part 2 of 2